 My friends keep asking me if I’m less stressed “this time around….” They wonder if since this is my second wedding, I’m less intense or less interested in all the little details…
Um… Nope. I’m still every bit as crazy as I was the last time.
Let me be clear though: I’m not the bride that is dictating that the bridesmaids have identical hairdo’s or that felt the urge to spend thousands on a wedding dress. Oh no. My bridesmaids (might I point out my life long best friends and sister in laws) have been given one detail: Wear navy and have alcohol standing by for me. Simple right? Oh, and my wedding dress? Um, the groom is wearing Burberry and the bride is wearing J.Crew. Does this get me the coolest bride of the year award yet, or what?
Unfortunately, the cool and calm shtick stops there though because as a DIY and party decor addict, unlike the world of bridal a decade ago, I now have Pinterest to blame for inundated inspiration and blogger friends like Eden of Sugar and Charm to share amazing ideas. Shortly after I got engaged, Eden and I had lunch. I shared with her my vision for my “Grapes of Wrath Chic” wedding and on the shelf of the restaurant we were at was an old crushed tomato can. Hmm… Eden suggested I “do something like that…” So I did a little search on the internet, found a great blog post from Organize & Decorate Everything and soon enough, I had my very own Breaking Bad type factory underway.
WHAT YOU’LL NEED:
-CANS, of course! ( I had a family member who works in a school district collect tons from the cafeterias)
–Birchwood/Casey Plum Brown Barrel Finish (this is used for for cleaning a gun or something. So you can probably find at a gun supply store, but I opted for Amazon instead). I had about 52 cans, so I purchased 2 bottles of this.
–Birchwood/ Casey Cleaner/Degreaser
-Rag (to apply the cleaner)
-Tooth Brush (to apply the plum brown)
-rubber gloves to keep your hands from burning off (half kidding)
-Hot plate or Electric Stove Top
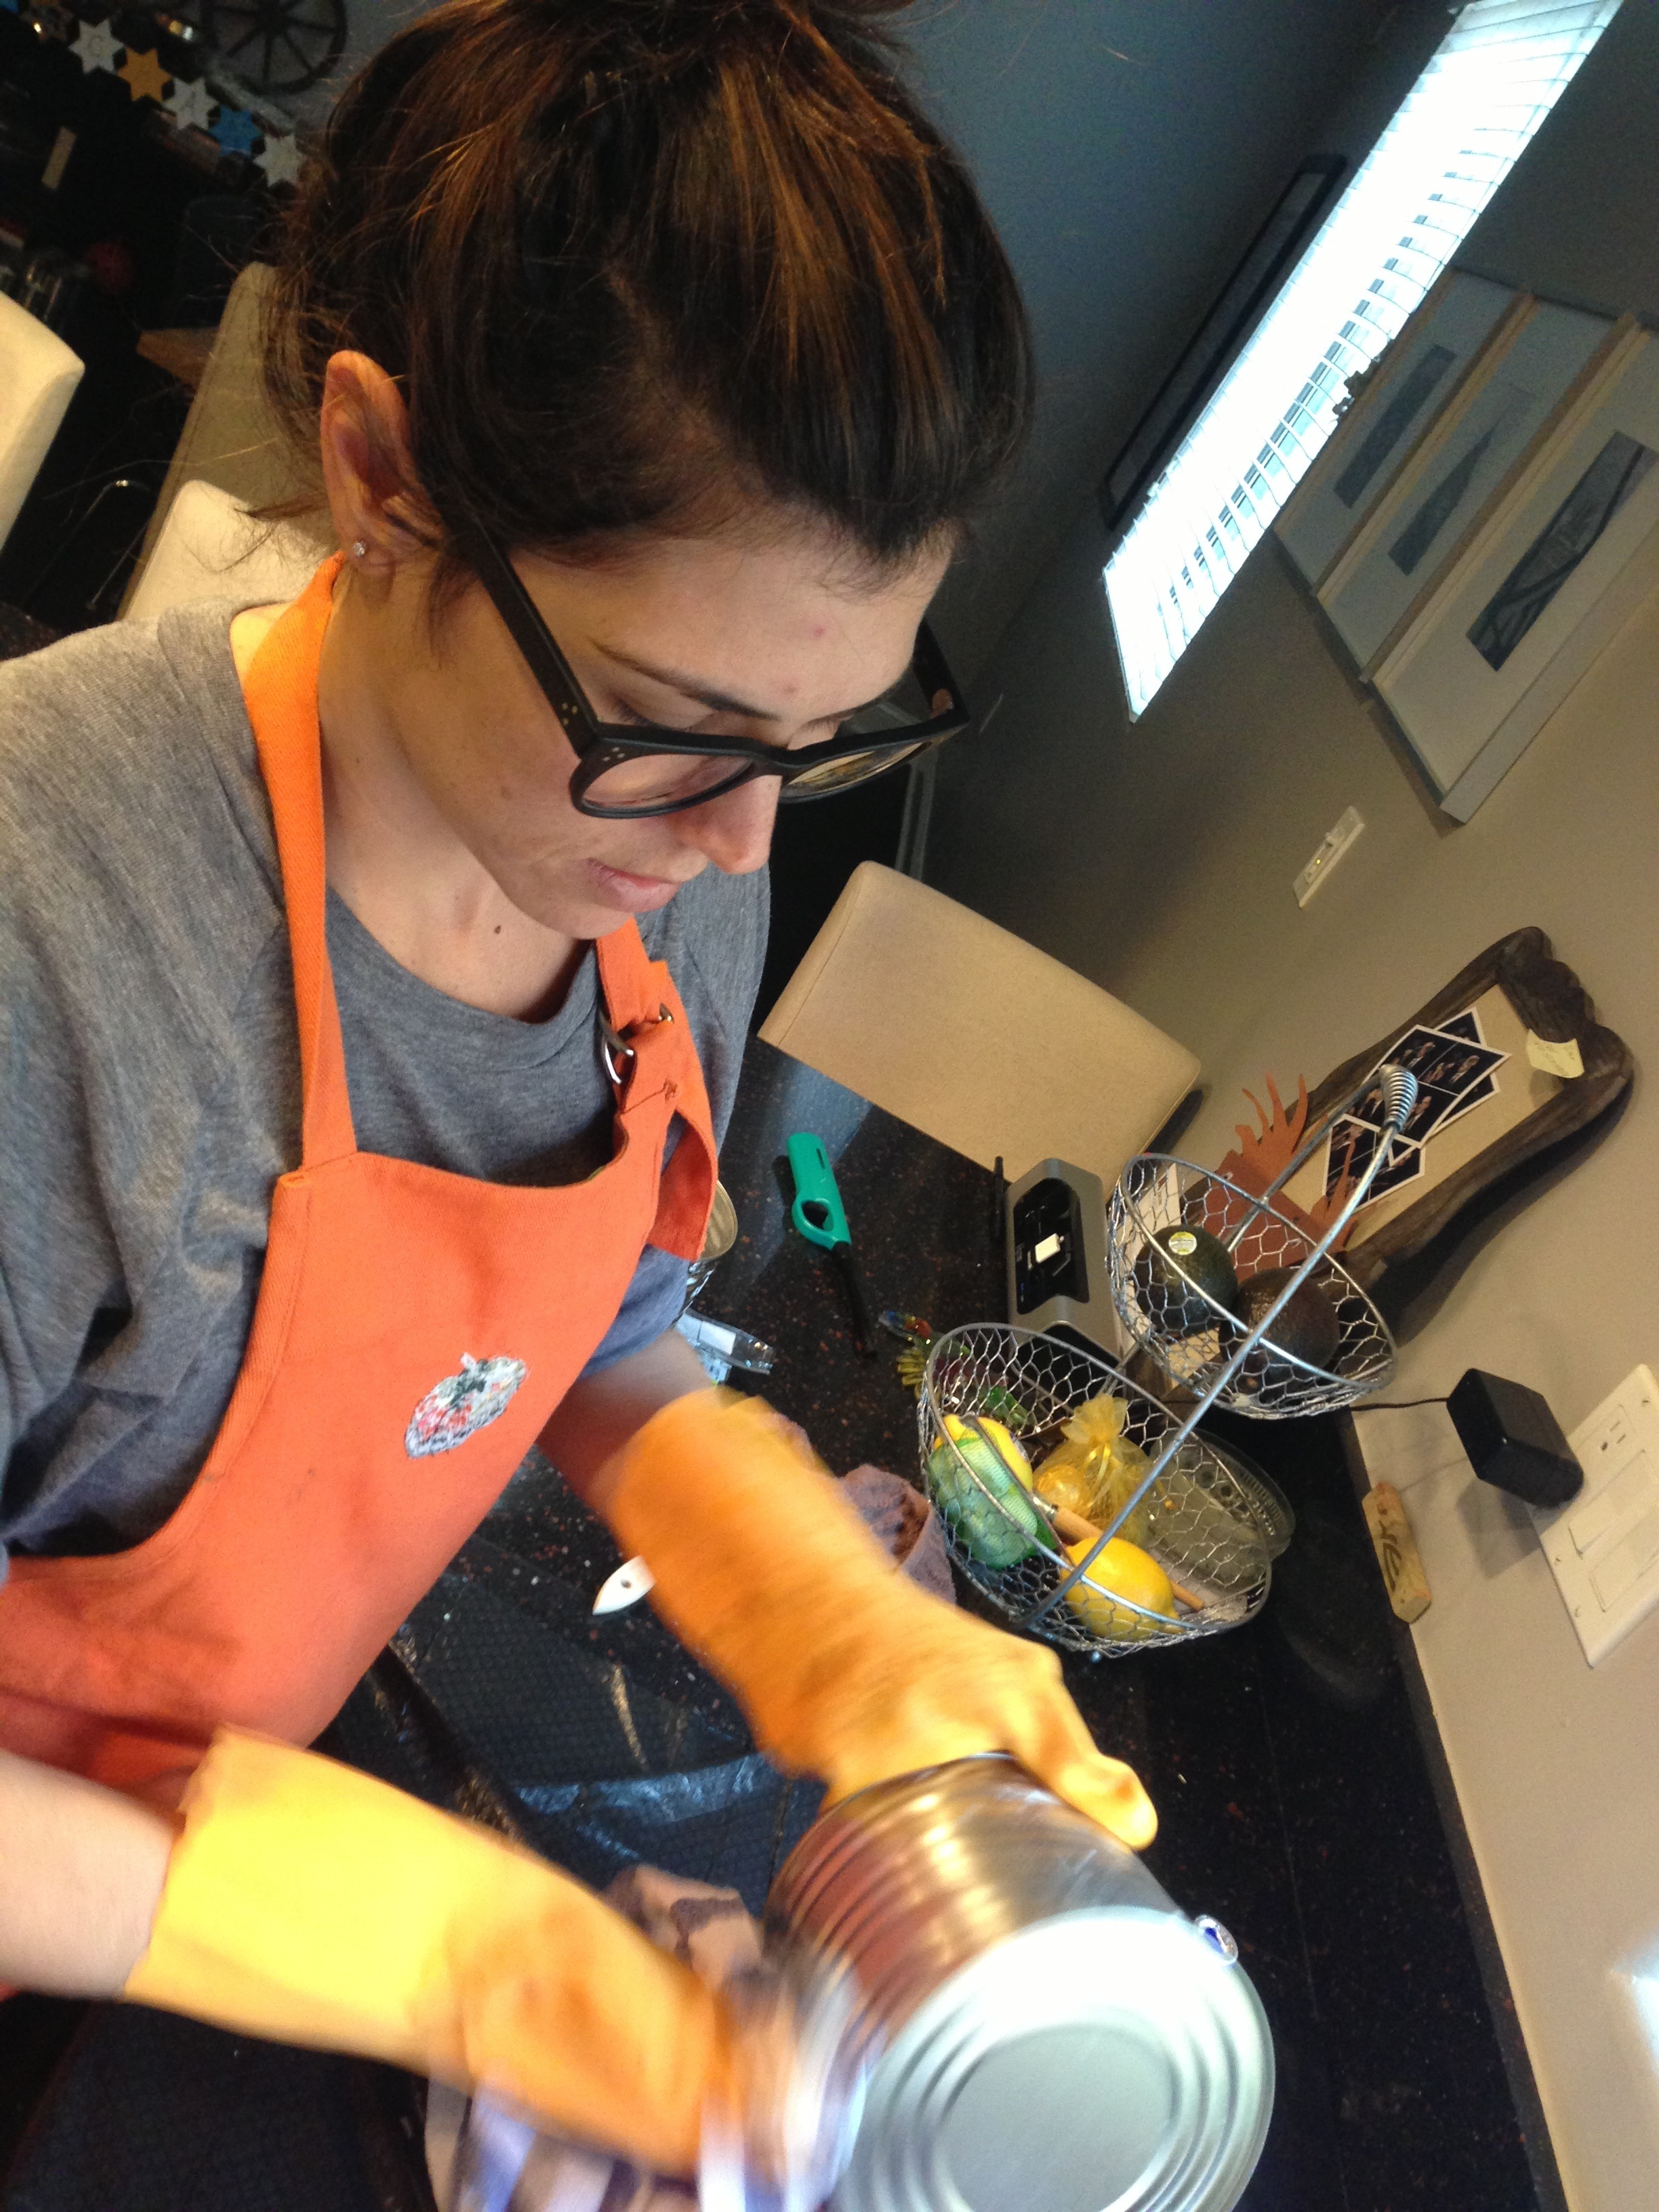
**Note: It was hard to take pictures of the process for fear my kitchen was going to explode. Making these cans are not that hard to do, but it definitely requires some patience and some prep work, and if you can, an extra pair of hands. The Plum Brown and Degreaser are crazy toxic smelling so if you do decide to do this inside, I would suggest doing it with all the windows open. I also suggest wearing an apron and lining your counters or table with plastic Trash bags and wearing glasses to protect your eyes. I’m one cautious DIY-er. What can I say?!
THE STEPS
 -Peel off all of the labels. It’s okay to leave the glue on. Aside from the fumes, I found that it actually gave it a cool effect when it got burnt.
-Pour some of the Cleaner Degreaser on a Rag.
-Rub the liquid all over the outside of the can with the rag. (I only did outside of cans)
-Dry off the liquid with another dry rag.
-Dip a toothbrush into the Plum Brown. Brush it (up and down) on the can. I started at the bottoms and worked my way around. Then the middle, then the top. I probably dipped 4-5 times. I did this over the plastic bag and set the wet cans that were ready to “get rusty” in the sink”
-Using Tongs, lift the can from the sink and place on your hot plate (if you have it) or directly on the stove top (at a medium flame) for about 20-30 seconds. The tongs are great because you can use it to turn the can to get the heat everywhere. You’ll see the can start to get rusty. The plum barrel will likely drip on to your stove or hot plate but with a little scrubbing, it does come up.
Don’t touch the cans! They get hot so let them cool off! Once they’ve cooled off, it’s time for labels!
LABELS
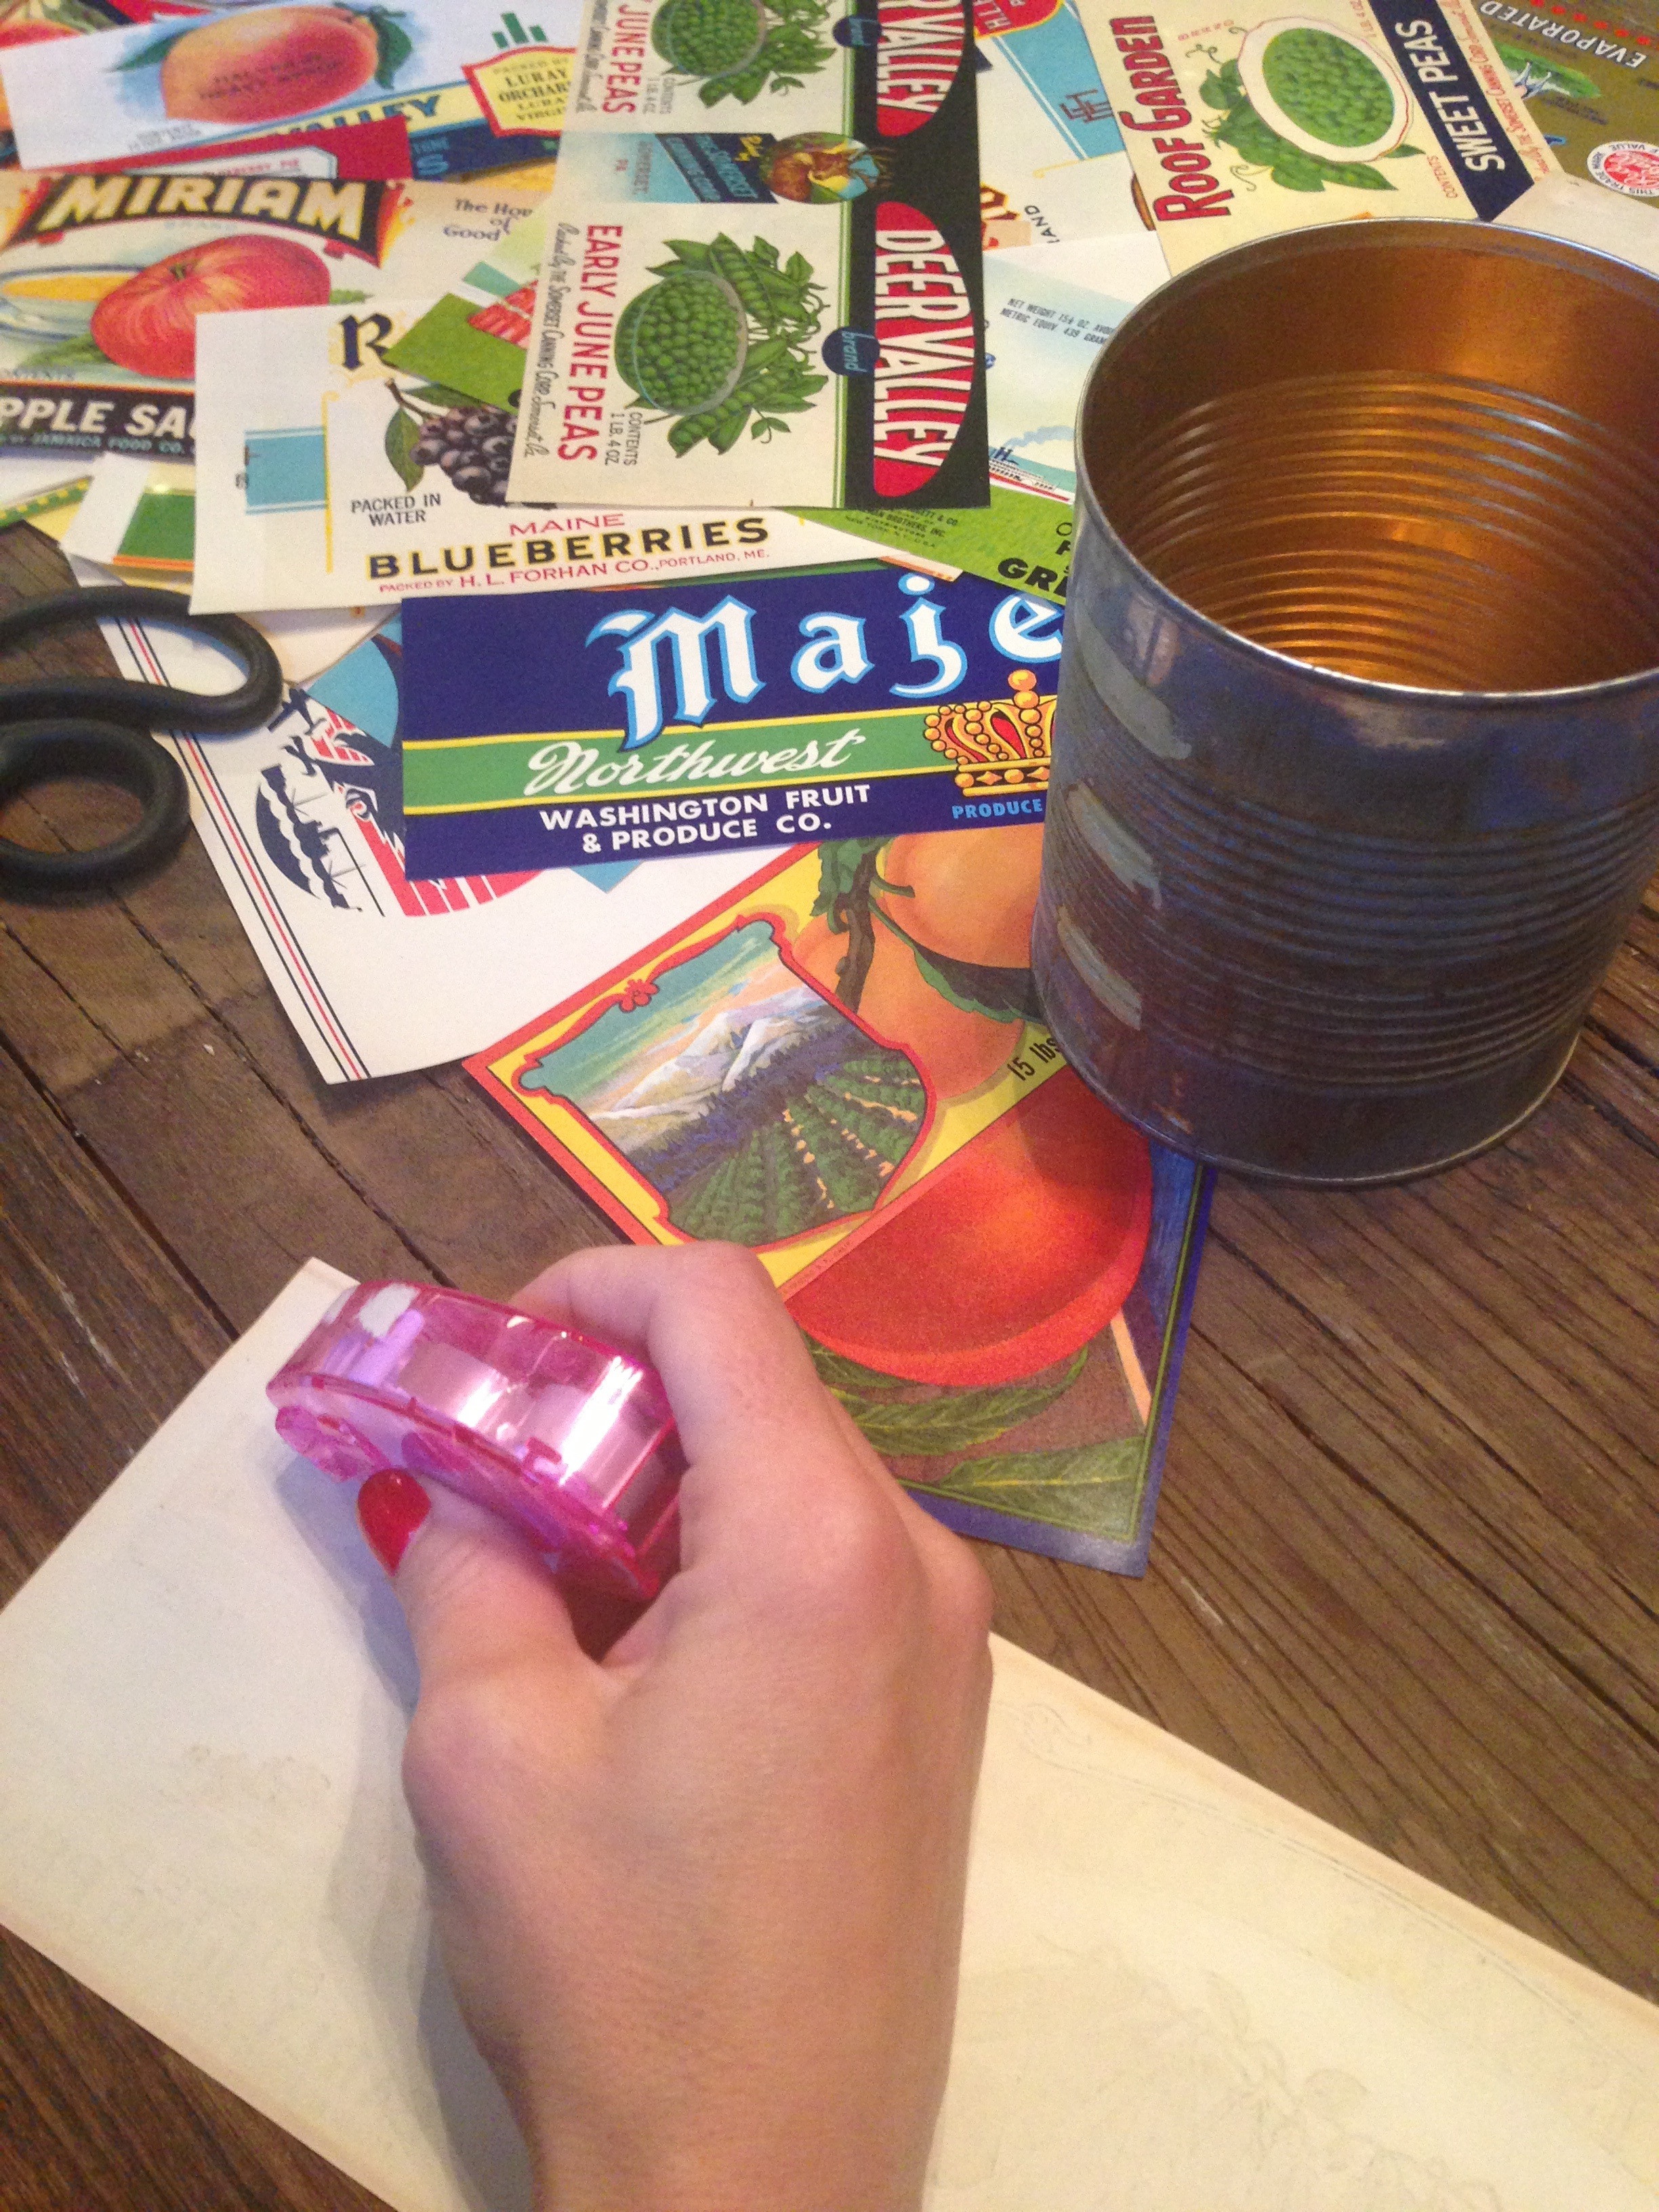
-I found a great shop on Etsy called Labelstone. They had the exact vintage fruit and vegetable labels I was looking for to go.
-There was no rhyme or reason when choosing what label I’d use for what can. I just went for it!
-I used a tape runner on the edges of the labels and a couple in the middle and stuck/wrapped them around the can.

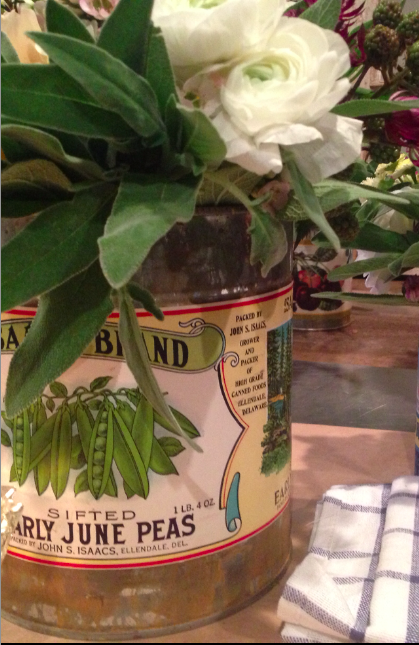
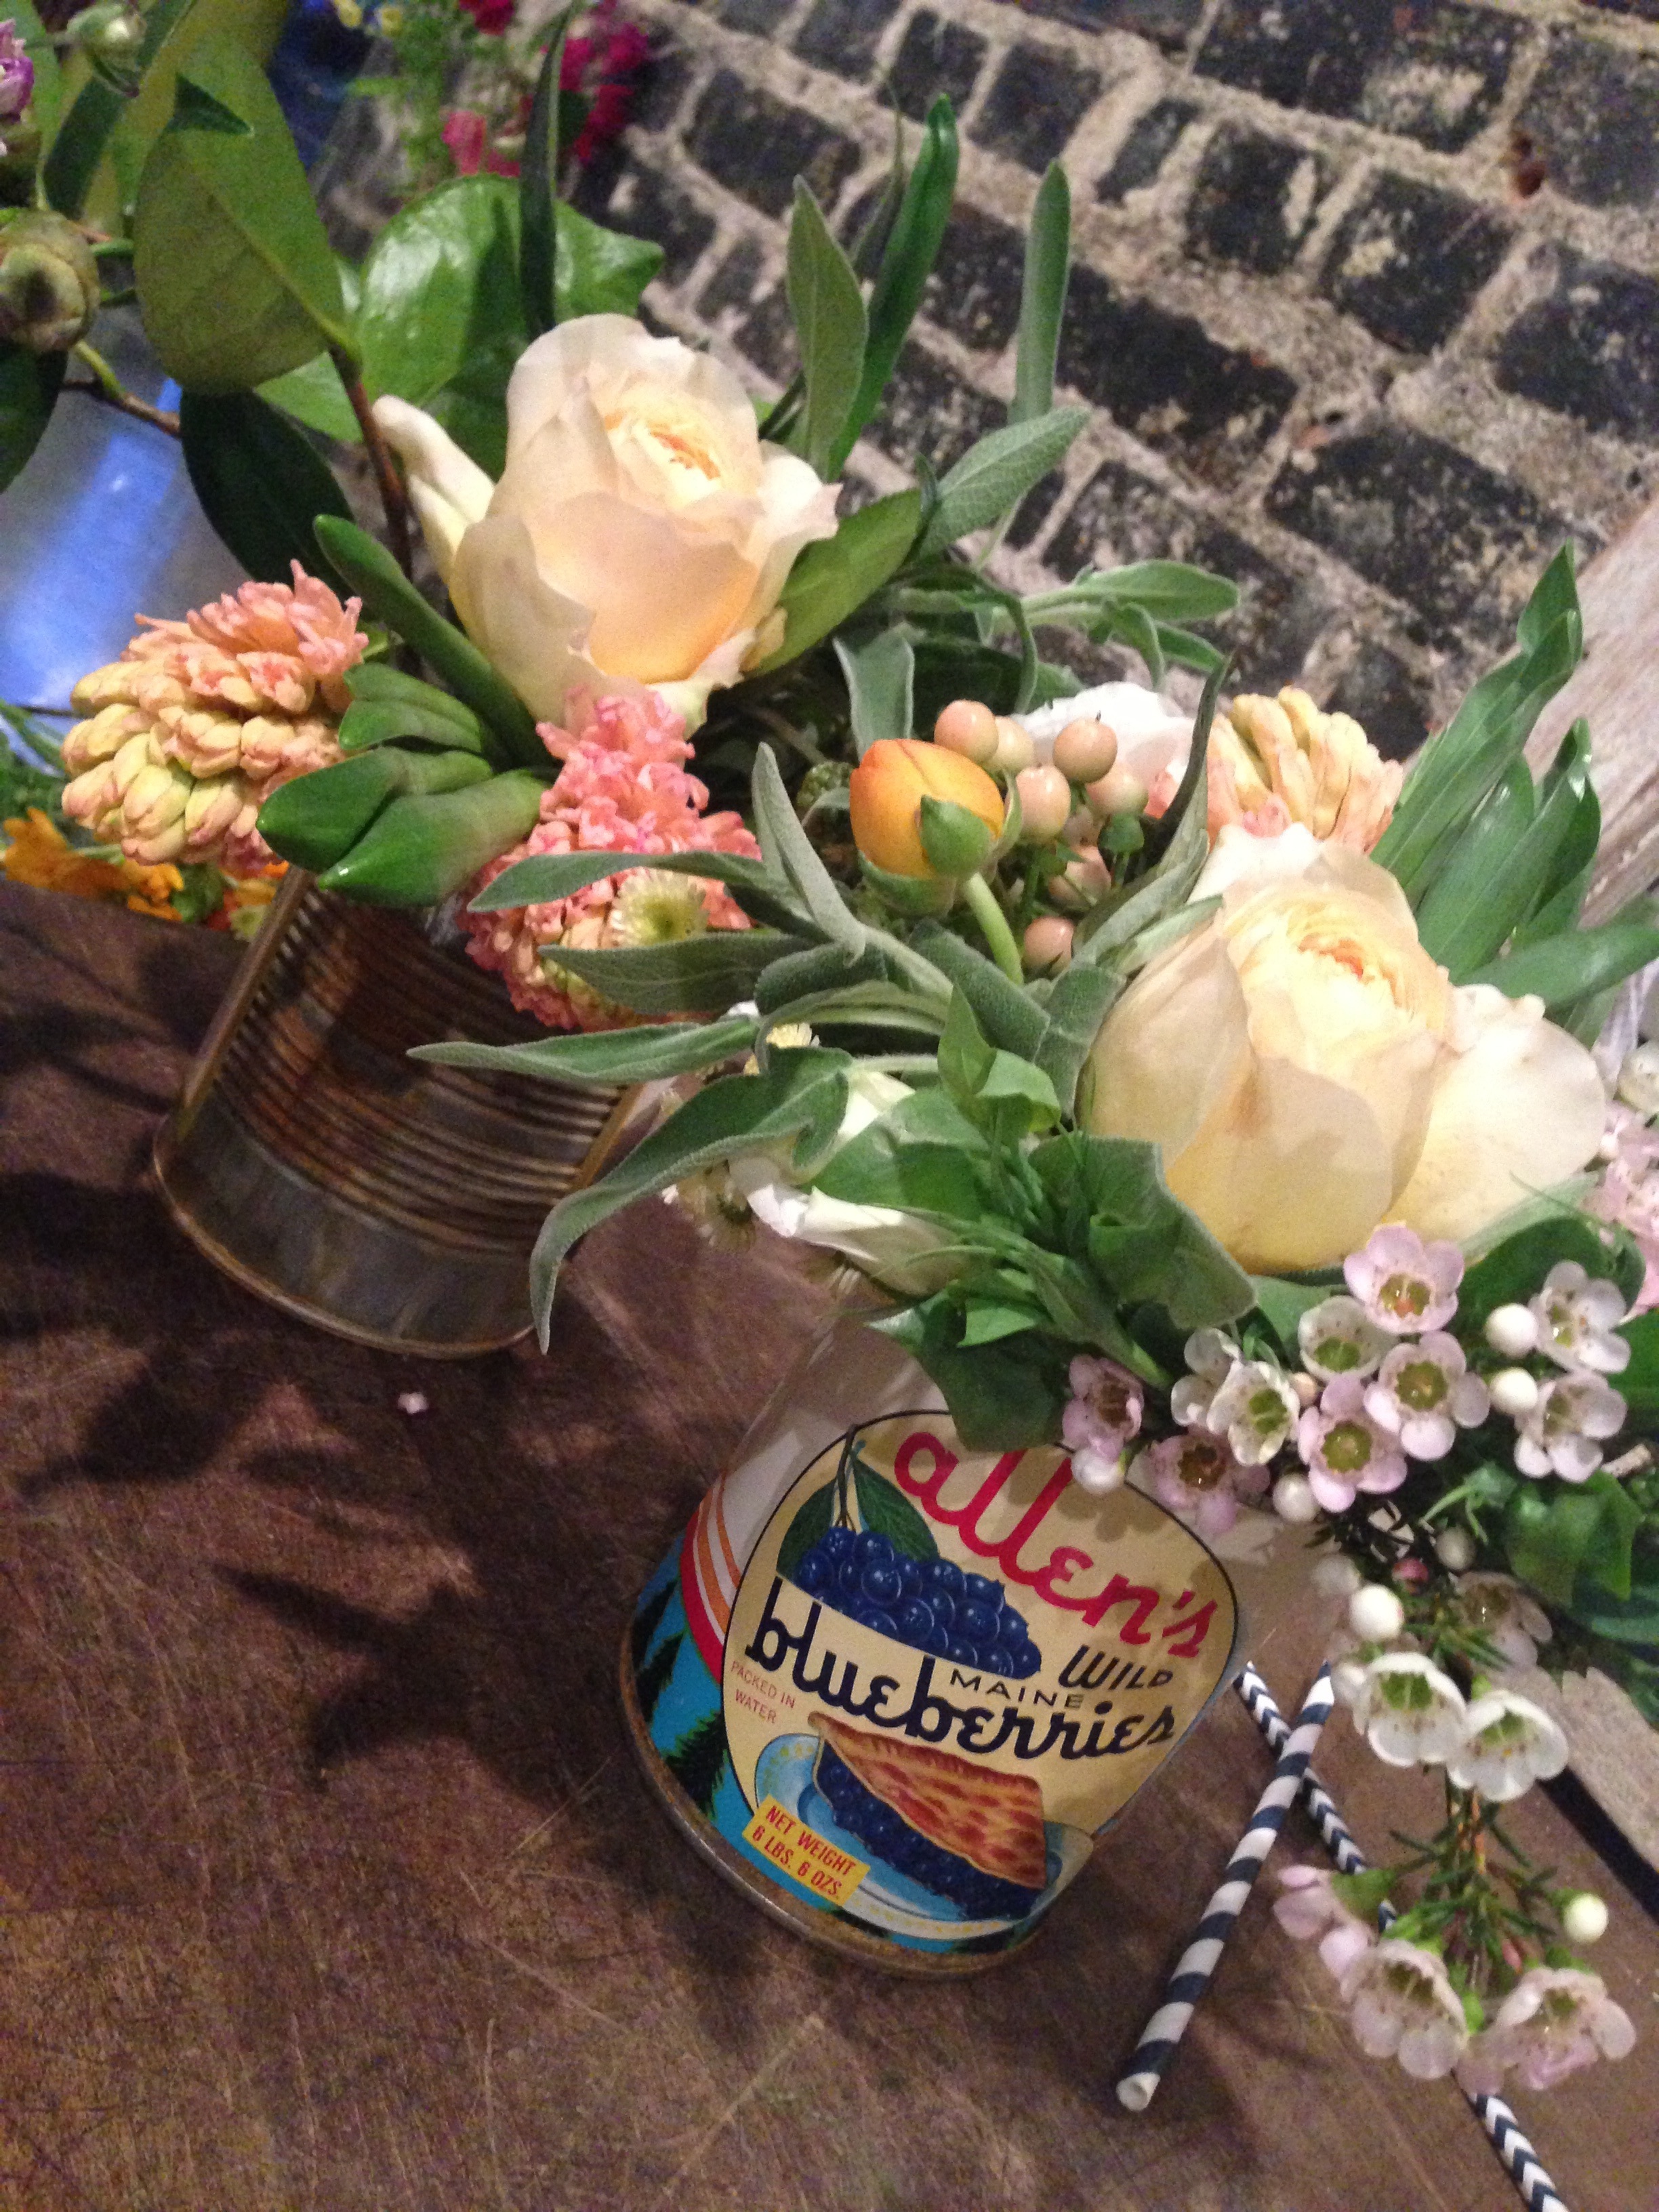
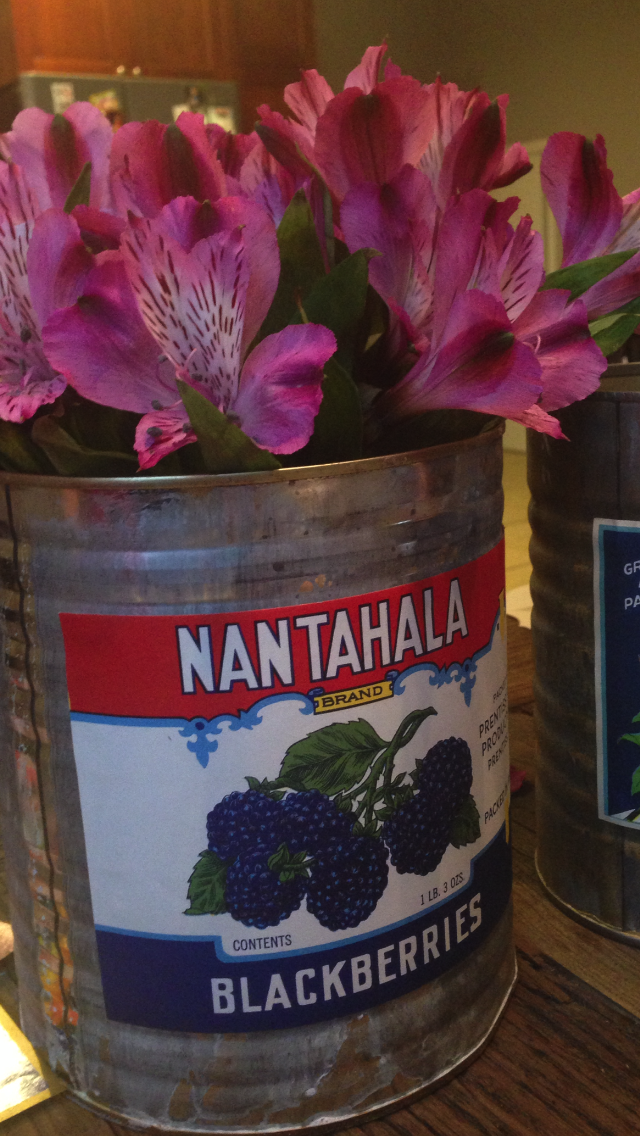
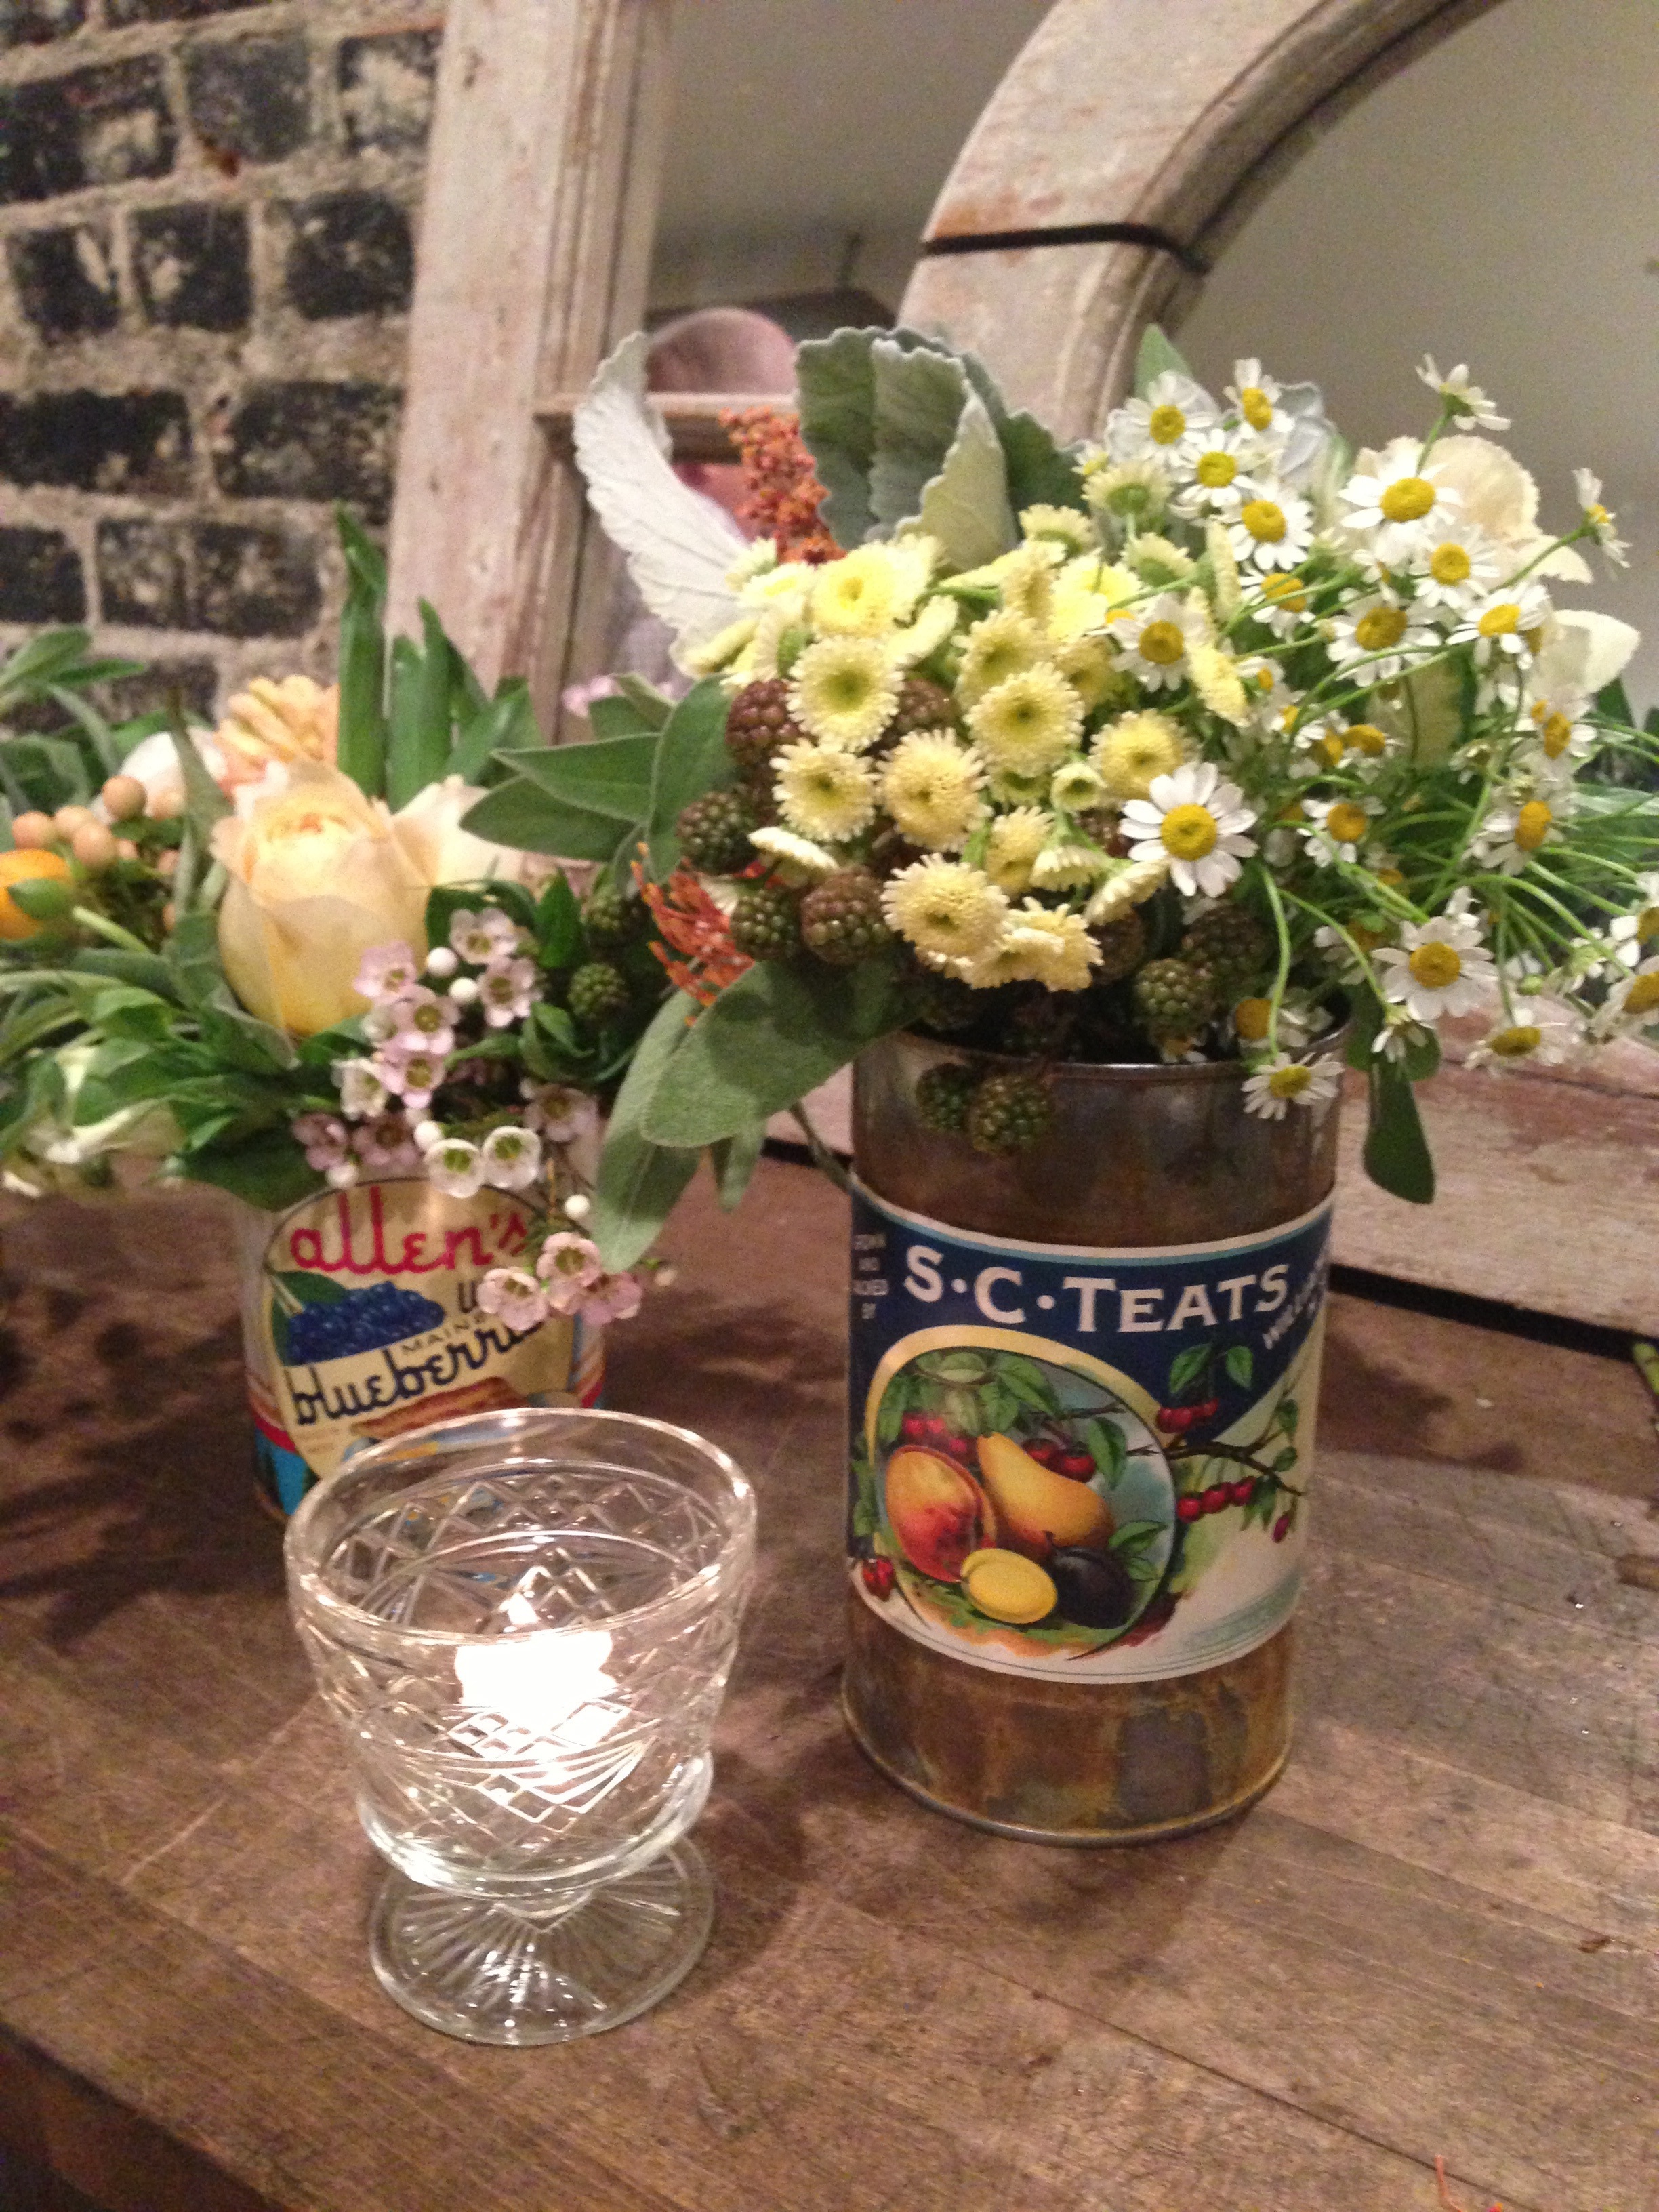
These cans will be used throughout our reception. On the reception tables, they’ll be put on top of reclaimed wood table runners (also from a fab find on Etsy), and positioned in clusters with mismatched cut crystal punch cups used for votives and a desert plate which I’ll stencil for table numbers.
So there you have it! Vintage cans +crazy bride = A very happily ever after.


Leave a Comment
Comments

-
- April 2021
- March 2021
- September 2019
- April 2019
- February 2019
- December 2018
- November 2018
- September 2018
- May 2018
- January 2018
- December 2017
- November 2017
- October 2017
- May 2017
- April 2017
- February 2017
- November 2016
- October 2016
- September 2016
- August 2016
- July 2016
- June 2016
- May 2016
- April 2016
- March 2016
- February 2016
- December 2015
- November 2015
- October 2015
- August 2015
- July 2015
- June 2015
- May 2015
- April 2015
- March 2015
- February 2015
- January 2015
- December 2014
- November 2014
- October 2014
- September 2014
- August 2014
- July 2014
- June 2014
- May 2014
- April 2014
- March 2014
- February 2014
- January 2014
- December 2013
- November 2013
- October 2013
- September 2013
- August 2013
- July 2013
- June 2013
- May 2013
- April 2013
- March 2013
- February 2013
- January 2013
- December 2012
- November 2012
- October 2012
- September 2012
- August 2012
- July 2012
- June 2012
- May 2012
- April 2012
- March 2012
- February 2012
- January 2012
- December 2011
- November 2011
- October 2011
- September 2011
- August 2011
- July 2011
- June 2011
- May 2011
- April 2011
- March 2011
- February 2011
- January 2011
- December 2010
- November 2010
- October 2010
- September 2010
- August 2010
- July 2010
- June 2010
- May 2010
- April 2010
- March 2010
- February 2010
- January 2010
- December 2009
- November 2009
- October 2009
- September 2009
- August 2009
- July 2009
- June 2009
- May 2009
- April 2009
- March 2009
- February 2009
- January 2009
- December 2008
- November 2008
- October 2008
- September 2008
- August 2008
- July 2008
- June 2008
- May 2008
- April 2008
- March 2008
- February 2008
- August 2007
- July 2007
- July 2006

-
zoo ∙ ziploc ∙ zen mommy ∙ You Tube ∙ Yoplait ∙ yoga pants ∙ yoga ∙ Yahoo ∙ XBox 360 ∙ writing ∙ writer's block ∙ wow ∙ worrier ∙ working out ∙ working moms ∙ Working Girl ∙ working from home ∙ work ∙ wordless wednesday ∙ wizard of oz ∙ winning the lotto ∙ wine ∙ Williams Sonoma ∙ whole foods ∙ whole 30 ∙ when harry met sally ∙ Wheels on the Bus ∙ what I'm really thinking ∙ whatever works ∙ Westin Maui ∙ Westin ∙ weeknight meals ∙ weekend trips ∙ weekends ∙ Weeds ∙ wedding prep ∙ wedding photos ∙ wedding invitations ∙ wedding dress ∙ wedding decor ∙ wedding ∙ weather ∙ wardrobe ∙ walks ∙ Wacky ∙ volunteering at school ∙ vocabulary ∙ Virgin Diet ∙ violence ∙ video ∙ Victoria Secret ∙ Viagra ∙ vegetables ∙ valentine's day ∙ vacuum monster ∙ vacation ∙ US Weekly ∙ unwashed hair ∙ Two Brunettes ∙ Twitter ∙ TweetUp ∙ TV's bad for babies ∙ turtles ∙ turning 40 ∙ turning 33 ∙ Turkey Bolognese ∙ Tropical Drinks ∙ trolley ∙ Tricia ∙ tribeswoman tits ∙ traveling ∙ travel ∙ transitions ∙ tragedy ∙ traffic ∙ Trader Joe's ∙ Toys ∙ Tori Spelling ∙ TOMS shoes ∙ Tom Cruise ∙ toilet ∙ To Do Lists ∙ toddlers ∙ Today Show ∙ tired mom ∙ Tiny Prints ∙ Tina Fey ∙ throw up ∙ throwing food ∙ Throwback Thursday ∙ three stooges ∙ this is 40 ∙ third child ∙ Things about me ∙ the secret ∙ therapy ∙ the perfect storm ∙ The Parker ∙ the Oscars ∙ The Naked Chef ∙ the List ∙ the Lakers ∙ The Grove ∙ the final rose ∙ The Curious Case of Benjamin Button ∙ The Bachelorette ∙ the bachelor ∙ Thanksgiving ∙ terrible two's ∙ teresa strasser ∙ temper tantrums ∙ telling the truth ∙ television ∙ teenager ∙ technology ∙ teaching manners ∙ taxes ∙ Target ∙ tan ∙ tampon ∙ taking risks ∙ taking a good photo ∙ taiwan-on ∙ Tae Bo ∙ tablescapes ∙ table manners ∙ T-Ko ∙ swing set ∙ swimming class ∙ sweat pants ∙ sushi ∙ survival mode ∙ surgery ∙ sunglasses ∙ summer wardrobe ∙ summer camp ∙ summer activities ∙ summer ∙ Sugar and Charm ∙ style ∙ student loans ∙ strong scents ∙ stress ∙ strangers ∙ storytelling ∙ staying home a Saturday night ∙ staycation ∙ status updates ∙ Starwood Preferred Guest ∙ star wars ∙ starting over ∙ stars they're just like us ∙ st. regis punta mita ∙ sprinkle cookies ∙ Spring cleaning ∙ spring break ∙ Spring ∙ sports control my husband ∙ sports ∙ Spoonful ∙ sponsored posts ∙ sponsored ∙ spokesperson ∙ Splendid ∙ spit up ∙ spa weekend ∙ Spanx ∙ spanks ∙ Spaghetti Squash ∙ spaghetti on the floor ∙ soy-free ∙ So Worth It ∙ soup ∙ soleil moon frye ∙ soleil moonfrye ∙ so happy ∙ Sofya ∙ social media ∙ SNL ∙ snapfish ∙ snacks ∙ snack ideas ∙ sleep training ∙ Sleep ∙ skinny mommy ∙ skincare ∙ skin ∙ silly mom ∙ Signing Times ∙ sick ∙ shopping with a baby ∙ Shopping ∙ shoes ∙ SheStreams ∙ shameless plugs ∙ sexy ∙ Sex and the City ∙ sesame street ∙ separation anxiety ∙ sense of humor ∙ self photos ∙ Self Magazine ∙ secret door ∙ season premieres ∙ searsStyle ∙ Sears ∙ school ∙ saying things you don't mean ∙ saying "No" ∙ Sarah Palin ∙ Sara Bareilles ∙ Santorini ∙ san francisco ∙ Sandy Koufax ∙ samples ∙ Salma Hayak ∙ salad ideas ∙ safety ∙ RSVP ∙ Rosh Hashanah ∙ Rome ∙ romance ∙ Rodan + Fields ∙ Rock N Republic Jeans ∙ Robin Saperstein ∙ road rage ∙ rites of passage ∙ ripped bodies ∙ religion ∙ Red Tricycle ∙ redshirting ∙ recipes ∙ real stories ∙ real men ∙ reality tv ∙ reading ∙ rap ∙ random facts ∙ raising a boy ∙ rain ∙ Raffi ∙ Rachel Zoe Project ∙ quicky ∙ questions ∙ quarantine ∙ Purim ∙ Project Runway ∙ producer J-Ko ∙ President ∙ Preschool ∙ pregnant ∙ pregnancy ∙ Potty training ∙ post partum ∙ poop ∙ Poolside reading material ∙ pool ∙ play kitchen ∙ playing pretend ∙ Plane ride ∙ placebo pill ∙ pizza ∙ pissed ∙ Piperlime ∙ Pinterest ∙ physical traits ∙ Peter ∙ perfectly disheveled ∙ perfect ankles ∙ Pelvic T's ∙ peloton ∙ pediatrician ∙ patience ∙ passover ∙ party themes ∙ party planning ∙ park rules ∙ Parking lot T-Ko ∙ paris ∙ parents ask ∙ parenting experts ∙ parenting ∙ paparrazi ∙ Papa ∙ Palin ∙ paleo ∙ pajamas ∙ painting ∙ P-Touch ∙ orgasm ∙ organization ∙ Oprah ∙ open letters ∙ online videos ∙ Olympics ∙ Olsen Twins ∙ Olly Smoothies ∙ Oliver Blue ∙ Oliver ∙ old photos ∙ old clothes ∙ old broad ∙ Ocean Spray ∙ ocean ∙ obesity ∙ NYU ∙ nutrition ∙ no time ∙ Nordstrom ∙ no more jokes ∙ night time ∙ nice people ∙ new york pastrami sandwiches ∙ New York ∙ new year's resolutions ∙ New Year's Eve ∙ Newton shooting ∙ new home ∙ Never having sex again ∙ neighbors ∙ necklaces ∙ national like yourself day ∙ Nanny ∙ Nana ∙ nails ∙ my voice ∙ my nose ∙ my mom ∙ my life ∙ my dad ∙ my body ∙ mute husbands ∙ music ∙ muffin top ∙ moving ∙ mothers day ∙ Mother in laws ∙ motherhood ∙ morning rituals ∙ Monrow ∙ monkeys ∙ money saving deals ∙ Monday Manners ∙ momversation ∙ mom of three ∙ mom of boys ∙ Momnesia ∙ Mommy Track'd ∙ mommy time ∙ Mommy and Me ∙ Momma's Boy ∙ Mom Logic ∙ mom jeans ∙ mom guilt ∙ mom bloggers ∙ mombloggers ∙ ML Community ∙ Minted ∙ Michelle Obama ∙ Michael Phelps ∙ Michael Buble ∙ mexico ∙ memorial day weekend ∙ Meme ∙ McDonald's ∙ Maui ∙ massages ∙ Martha Stewart ∙ marriage ∙ marc jacobs purse ∙ March Post ∙ manicure ∙ making babies ∙ makeup ∙ make up ∙ makeover ∙ lying ∙ luxury travel ∙ lunch ideas ∙ lululemon ∙ lucy closet ∙ Lucy ∙ Lucky Shops LA ∙ Louis C.K. ∙ loud movies ∙ Lost ∙ losing your wedding ring ∙ losing weight ∙ Los Angeles ∙ looking alike ∙ london ∙ LiveHealth Online ∙ List God ∙ Lisa Whelchel ∙ Lisa Gache ∙ lights ∙ Lifetime Moms ∙ lifestyle ∙ life lessons ∙ Leisure World ∙ leftovers ∙ Lee Ann Womack ∙ leaving the baby for the first time ∙ Leah Lee Photography ∙ laundry ∙ language ∙ La Mer ∙ Lady Gaga ∙ Ladies Home Journal ∙ labor ∙ labeling your child ∙ Kokomo ∙ Knocked Up ∙ KLEAN ∙ kindergarten ∙ Ketchum PR ∙ Kerry Walsh ∙ kate winslet ∙ Justin Bieber ∙ judaism ∙ Jonah ∙ Joe Flannigan ∙ job opportunities ∙ jewish moms ∙ jessica alba ∙ Jenna Elfman ∙ JC Penney ∙ jazz ∙ Italy ∙ iPhone Apps ∙ iPhone ∙ iPad ∙ interview ∙ instagram ∙ Inauguration ∙ imaginary friends ∙ idiots ∙ hypochondria ∙ hunger ∙ hottest women ∙ hotels ∙ hot dogs and hookers ∙ hot dog ∙ hostess ideas ∙ hospital ∙ horoscope ∙ hormones ∙ honeymoon ∙ honesty ∙ homeschool ∙ Home Depot ∙ home decor ∙ hollywood bowl ∙ Hollywood ∙ Holidays ∙ holiday cards ∙ Holiday ∙ Holidate ∙ hiking ∙ high school ∙ Her Say ∙ hersay ∙ healthy tips ∙ healthy foods ∙ hawaii ∙ Harvey Karp ∙ harvey fierstein ∙ harry connick jr. ∙ happy chaos ∙ Happiest Baby on the Block ∙ hanukkah ∙ hannukah ∙ Hands-Free ∙ handmedowns ∙ Halloween ∙ Haiti ∙ hair dye ∙ hair do ∙ gun violence ∙ guilt ∙ growing up ∙ grocery shopping ∙ Grey's Anatomy ∙ greece ∙ great gifts ∙ Grand Theft Auto ∙ grandparents ∙ Go To Meals ∙ Got Milk ∙ gorgeous ∙ Goodnight Moon ∙ good luck ∙ good hair ∙ golf ∙ Goldfish ∙ going back to work ∙ goals ∙ gluten-free ∙ Glennon Doyle ∙ GLAD ∙ giving birth ∙ giving back ∙ giveaways ∙ girls night out ∙ Giada De Laurentiis ∙ getting ready for baby ∙ getting organized ∙ getting old ∙ getting married ∙ germs ∙ George Clooney ∙ George Bush ∙ genetics ∙ Gelsons ∙ game night ∙ gambling ∙ FWTFL ∙ funny photos ∙ fun activities for kids ∙ frozen yogurt ∙ Friends ∙ fresh voices ∙ frequent sex ∙ freaks ∙ Four Seasons ∙ fortune ∙ football ∙ Food Network ∙ food karma ∙ Food ∙ flu ∙ flowers ∙ fitness ∙ fish ∙ first words ∙ first haircut ∙ first dentist appointment ∙ firemen ∙ filthy rich: cattle drive ∙ feeling fat ∙ Feed the Children ∙ favorite posts ∙ Father's Day ∙ Faster Way to Fat Loss ∙ fashion ∙ farmers market ∙ family vacation ∙ family time ∙ family pictures ∙ family meals ∙ family finds ∙ family ∙ fall wardrobe ∙ Fall TV ∙ falling in love ∙ Fall Fashion ∙ Fall ∙ Facts of Life ∙ face cream ∙ Facebook ∙ extra income ∙ explaining life and death ∙ Exersaucer ∙ exercise ∙ Example 7 ∙ Everett ∙ eva mendes ∙ etsy ∙ errands ∙ environment ∙ entertaining ∙ engagement ∙ empire waist ∙ emotions ∙ Emily Post ∙ emergencies ∙ embarrassing moments ∙ Elmo ∙ Elle ∙ Elf ∙ Election 2008 ∙ education ∙ Eckhart Tolle ∙ eBay Collections ∙ eBay ∙ eating healthy ∙ eating habits ∙ easy recipes ∙ earth day ∙ early 90's ∙ Dustin Diamond ∙ Duff ∙ Duck ∙ drivers license ∙ drill guns ∙ dresses ∙ dreams ∙ Dr. Bonnie Zucker ∙ douche bags ∙ dorky girl ∙ Don't Forget the Lyrics ∙ domain name ∙ doing lunch ∙ dog ∙ Dodgers ∙ DIY Projects ∙ DIY ∙ divorce ∙ disneyland ∙ Disney ∙ disheveled mommy ∙ discipline ∙ dirty mommy ∙ dinner ∙ digital photos ∙ digital influencers ∙ diet ∙ Diane Mizota ∙ dessert ∙ design ∙ dentist ∙ Deluxe Suite ∙ decorating ∙ day care ∙ daycare ∙ date night ∙ Dart DJ ∙ dance ∙ dairy-free ∙ daddy's in charge ∙ CVS ∙ cute gifts for kids ∙ curly hair ∙ curious george ∙ Crying ∙ crotch ∙ Crocs Cares ∙ Croatian ∙ crazy people ∙ crazy mommy ∙ crafts ∙ CPK ∙ covid ∙ cottonelle ∙ costco ∙ Corey Feldman ∙ cooking ∙ conversations with my son ∙ control freak ∙ constipation ∙ confessions of a shopaholic ∙ Concert ∙ commute to work ∙ comfort food ∙ comfort ∙ college ∙ Coldplay ∙ Coffee Club ∙ coffee ∙ cocktail ∙ club ∙ cleansing ∙ Cleanse ∙ cleaning ∙ clean eating ∙ Citrus Lane ∙ cigarettes ∙ christmas ∙ Christian Louboutin ∙ chris farley ∙ CHLA ∙ Children's Hospital Los Angeles ∙ children's clothing ∙ Children ∙ child care ∙ Chick magnet ∙ chick flicks ∙ chicken recipes ∙ chicago ∙ cheese ∙ cheerios ∙ charity ∙ chaos ∙ chanukah ∙ Channing Tatum ∙ Chandler Bing ∙ champagne ∙ cell phone ∙ celebrity ∙ CBS ∙ car kharma ∙ career ∙ car accident ∙ Canada ∙ California Pizza Kitchen ∙ California Chicken Cafe ∙ busy moms ∙ burnt toast ∙ burning calories ∙ burlap art ∙ burke williams ∙ bucket list ∙ brunch ∙ Brother ∙ brittany murphy ∙ Britney Spears ∙ Bridezilla ∙ Bridal shower ∙ bribery ∙ Breezy Mama ∙ Breastfeeding ∙ branded video ∙ bragging rights ∙ bra ∙ boyfriend ∙ boogers ∙ boobs ∙ Bodice ∙ BlogHer ∙ blog events ∙ blog ∙ bling ∙ blankie ∙ blackberry ∙ birthday parties ∙ birthday ∙ birds ∙ bird poop ∙ Bird ∙ bikini wax ∙ big hoo ha ∙ big boy bed ∙ big bangs ∙ Betsy Brown Braun ∙ best butts ∙ being vain ∙ being smart ∙ being married for years ∙ being kind ∙ being jewish ∙ being happy ∙ being gay ∙ being cool ∙ being a single mom ∙ being a new mom ∙ being a klutz ∙ being a good mommy ∙ being a clutz ∙ behavior ∙ Been There Done that Moms ∙ Beem-Beem ∙ bedtime ∙ becoming a woman ∙ beauty ∙ Beatles ∙ Beach Boys ∙ beach ∙ bathroom ∙ bathing suit season ∙ batch cooking ∙ baseball ∙ barilla ∙ barbara walters ∙ Barack Obama ∙ bangles ∙ balance ∙ baking ∙ bad teeth ∙ bad photos ∙ bad gas ∙ bad drivers ∙ bad dreams ∙ back to school ∙ back seat driver ∙ back fat ∙ bachelor party ∙ bachelorette party ∙ baby weight ∙ baby vocabulary ∙ babysitter ∙ baby shower ∙ baby products ∙ baby einstein ∙ Baby-Ko ∙ baby ∙ Babies R Us ∙ askmen.com ∙ Ash-A-Wee ∙ art ∙ aquanet ∙ Apple ∙ AP English ∙ anxiety ∙ anti-aging ∙ anniversary gifts ∙ anniversary ∙ animal lovers ∙ angry ∙ Anaheim ∙ amusement parks ∙ American Gladiators ∙ Amalfi Coast ∙ after school snacks ∙ adulthood ∙ acts of kindess ∙ activities for kids ∙ acting ∙ Accidentally on Purpose ∙ accessories ∙ acceptance speech ∙ 90210 ∙ 2021 ∙ 2012 ∙ 2011 ∙ 2009 ∙ 1990's ∙ 1980's ∙ 100 Days of Happy ∙ 60th birthday ∙ 30 Rock ∙ 12 Days of Mommy ∙ #WeAreLucky
Error: No feed found.
Please go to the Instagram Feed settings page to create a feed.

Mitolyn is a carefully developed, plant-based formula created to help support metabolic efficiency and encourage healthy, lasting weight management.